15 October, 2011

Updating SharePoint list by using InfoPath form


Step 1: Create the list

1. Create a new custom list named: MyContacts
2. From the Settings button choose List Settings
3. Click Create Column
4. Add the following columns/data types:
• FirstName, Single line of text
• LastName, Single line of text
• Email, Single line of text
• Phone, Single line of text

The next step is to create a Collaborative Application Markup Language (CAML) template that contains the same XML nodes as the columns we added to our list – this will be used as a secondary data connection in the InfoPath Form Template.

Step 2: Create the CAML template

1. Launch Notepad (or any text editor)
2. Copy and paste the following code to the Notepad document:
<?xml version="1.0" encoding="UTF-8"?>
<Batch OnError="Continue">
    <Method ID="1" Cmd="New">
        <Field Name='Title'></Field>
        <Field Name="FirstName"></Field>
        <Field Name="LastName"></Field>
        <Field Name="Email"></Field>
        <Field Name="Phone"></Field>
    </Method>
</Batch>
3. Save this as: Add List Item Template.xml

Step 3: Create the InfoPath Form Template

1. Create a new, blank, browser-compatible form template
2. Add a “Receive” type secondary data connection to the Add List Item Template.xml file created in Step #2. (Make sure the options “Include the data as a resource file in the form template” and “Automatically retrieve data when the form is opened” are enabled.)
3. Add a “Receive” type secondary data connection to the “MyContacts” SharePoint List created in Step #1 and make sure the option “Automatically retrieve data when the form is opened” is enabled.

Step 4: Identify the list GUID

1. Open a browser and navigate to the MyContacts list
2. From the Settings menu choose List Settings
3. In the browser’s address bar you will see the URL appended with “List=”
4. Copy everything after the equals sign and paste this into a text editor as we will need this value later on.

NOTE: We will need the list GUID to be formatted as “{xxxxxxxx-xxxx-xxxx-xxxx-xxxxxxxxxxxx}”. If your GUID appears as above with the hyphens and braces “escaped” (i.e. %7B for the braces and %2D for the hyphens) then you will need to replace the escaped characters with the braces and hyphens so when we use this GUID later, it will appear as: {0D73FBB5-88E1-4435-B607-51ADC5DA6D58}

Step 5: Add controls to the InfoPath Form Template

1. Open the Data Source Task Pane
2. From the Data Source dropdown box choose the “MyContacts” connection
3. Right-click on “MyContacts” and choose Repeating Table – this will add a repeating table bound to that connection to your View
4. From the Data Source dropdown box choose Main
5. Add a text box to the “myFields” node named: ListName and set the Default Value property to the GUID value of your list – we will use this node to specify the list when we perform the Submit operation


To update the SharePoint list we will be using the “UpdateListItems” method of the SharePoint “lists.asmx” web service. This web method requires a couple of parameters (the list name and what gets updated) – now that we have added the “ListName” node which contains the GUID and we have the Add List Item Template XML data connection which describes our data structure we have all the necessary information to add the “UpdateListItems” web method!

Step 6: Add the “lists.asmx” web service

1. Add a new “Submit” type of web service data connection to the “lists.asmx” web service – this is typically located at: http://servername/_vti_bin/lists.asmx
2. Select the “UpdateListItems” operation
3. Double-click the “listname” parameter and assign the “my:ListName” node as the value

4. Double-click the “updates” parameter, select the “Add list Item Parameter” data source, select “Batch” and click OK
5. For the “Include” option select “XML subtree, including selected element”

6. Complete the Data Connection Wizard

Now that we have all the connections that are required, we now need to add the “submit” functionality to the form template.

Step 7: Add Submit functionality

1. Display the Data Source Task Pane
2. From the Data Source dropdown box choose the Add List Item Template data connection
3. Drill down through the data source, right-click on the Field node and choose Repeating Table

We need to change the text box control in the “Name” column to Read-only – if these values were to be changed it would affect the CAML and the submit would fail.
• Double-click on the text box in the Name column of the Repeating Table
• Select the Display tab
• Enable the Read-only property and click OK
• Add a new Button control to the View
• Double-click the button to display the Properties
• Click the Submit Options button
• Enable the option “Allow users to submit this form”
• Enable the option “Perform custom action using Rules” and click the Rules button
• Click the Add button
• Click the Add Action button
• From the Action dropdown box choose “Submit using a data connection”, select the “Web Service Submit” data connection and click OK
• Click the Add Action button
• From the Action dropdown box choose “Query using a data connection”, select the “MyContacts” data connection and click OK (this will automatically refresh the list in InfoPath so you can see the newly added record)
• Click OK until you are back to your form


Step 8: Test
1. Click the Preview button to preview the form
2. Fill in values for each of the fields: Title, First Name, Last Name, E-mail and Phone
3. Click the Submit button – the contact information should be submitted successfully and the “MyContacts” list automatically updated!


If you have any queries/questions regarding the above mentioned information then please let me know..
I would be more than HAPPY 2 HELP you as well as RESOLVES your issues, Thank you
You do not have the necessary permissions to use the 'ListName' object. Have your system administrator or the person who created this object establish the appropriate permissions for you.


Today I worked on one issue and would like to share the resolution details with all of you so that we can efficiently resolve any forthcoming issues based on the same type.

Problem description:
When You try to add an existing sharepoint list to a Microsoft Office Access 2007 database then you receive an error message that resembles the following:

Error message: You do not have the necessary permissions to use the '<ListName>' object. Have your system administrator or the person who created this object establish the appropriate permissions for you.

Action Taken:
1) Checked the number of groups which are present on the site and user permissions on the site as well as for the specific list that we trying to connect
2) User has Full control on the site as well as for the list also so problem is not from sharepoint end
3) Checked the office application installed on the system and found multiple version which consist of office 2003 as well as office 2007
4) Checked the access version and found out it belongs to Office 2007 suite
5) Checked on my machine to reproduced the same and we are able to reproduced it so the problem is not from the Office suite
6) User conveyed that its working on one of the sharepoint site and compare both the sites and found out some differences in terms of columns and characters but to make sure did research and found the Microsoft KB: http://support.microsoft.com/kb/924739

Microsoft KB states that it’s a known issue. Details as follows:
Cause: This problem occurs because the Access 2007 database engine disallows columns that have names that contain more than 64 characters.

Workaround: To work around this problem, use only column names that contain less than 64 characters in SharePoint lists.

Resolution for this issue: there was one column which has more than 64 characters, we shorten the column name and tried connecting the list to access and it works without any issues.

If you have any queries/questions regarding the mentioned information then please let me know.
I would be more than HAPPY 2 HELP you as well as RESOLVES your issues, thank you

08 October, 2011

Publish a InfoPath 2010 form to Form Library in SharePoint 2010

How to Publish an InfoPath 2010 form to Form Library in SharePoint 2010

When you are finished designing a form template, you must publish it so that users can fill out forms based on the form template.

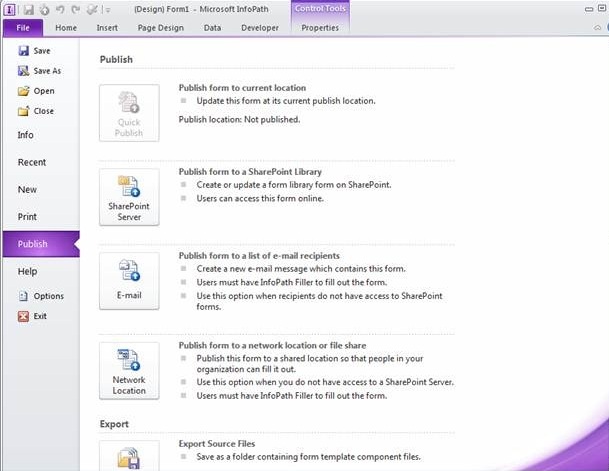
While publishing an InfoPath form, we have multiple options available such as
1)     Quick Publish: Publish form to current location
2)    SharePoint Server: Publish form to a SharePoint Library
3)     E-mail: Publish form to a list of e-mail recipients
4)    Network Location: Publish form to a network location or file share

In this part, we will see How to publish an InfoPath form to a SharePoint Library
Please refer the step by step details and your form will be published to the SharePoint library without any problems:
  • Click File.
  • Click Publish.
  • Click SharePoint Server


  • Enter the Web address of the SharePoint site in the text box.
  • Click Next
  • Select how to publish the form
  • Select Form 
  • Click Next
  • Click a pre-existing form library for the InfoPath form if one has already been created or click Create a new form library to create a new one.
  • Click Next
  • If you are creating a new SharePoint library, enter the name of the library in the Name text box and a description for the library in the Description text box.
  • Click Next
  • To display data from your form as a column in the form library, use property promotion. To do this, click Add, select a desired field, and then type a name for the column in the Column name box.
  • If you selected a repeating field, click a value in the Function list to define how to display the field in the form library, and then click OK.
  • Click Next.
  • Click Publish.
If you have any queries/questions regarding the above mentioned information then please let me know. I would be more than HAPPY 2 HELP AS WELL AS RESOLVES UR ISSUES


References:

07 October, 2011

Click for help about adding HTML formatting.

Few days before I worked on one issue in which Basic HTML formatting option is not available in SharePoint i.e. we were not getting full fledge rich text editor options. Here are the details:

Machine configuration:
------------------------------------
OS: Windows Server 2003 x64 Bit
IE: Internet Explorer 7.0 x64 Bit
Office installed: 2007

Without Rich text editor:


Clicking on the
                                Click for help about adding HTML formatting.
Just take you to the normal help, nothing useful there.

Normal IE rendering for Rich Text Editor


Troubleshooting Done:

-------------------------------------
1) Checked by creating number of custom list as well as discussion boards but we were missing the rich text editor functionality and getting the message towards the bottom of the window as mentioned above.
2) checked on different operation systems with the same configuration and we are able to get the rich text editor options
3) checked on our machines and we are getting the complete options of rich text editor.
4)  After extensive troubleshooting and testing on different platforms, we found the exact root cause as why it’s not reflecting the complete rich text editor options.


Problem scope:
------------------------
Machine specific

Resolution:
------------------
This issue occurs if we use 64 bit configuration of IE (version 7) and works perfectly on normal IE version i.e. cipher strength 128 bit

Root cause:
-----------------
64 bit IE configuration

If you have any queries/questions regarding the above mentioned information then please let me know. I would be more than happy 2 help you as well as resolves your issues, thank you


Typs Of Document Libraries in SharePoint Server 2010

Document libraries are collections of files on SharePoint Server 2010 that you share with other site users. Most document management features are delivered through document libraries. As part of document management planning, you should determine the kind of document libraries that best fit your organization's needs. If you plan document libraries for multiple sites, you might have to plan the flow of content from one site to another. If you plan to use document libraries as storage locations, you can customize the Microsoft Office Professional 2010 Open dialog box and the Save dialog box to ensure that documents are stored in the preferred location.


Type of Library
Brief details/description
Asset Library
Asset Library allows you to create a rich media library and lets you create, browse, share, organize and mange images, audio and video files.
Data Connection Library
Here you can create, browse, share, organize and manage files that contain information about connecting to external data connections.
Document Library
Here you can create, browse, share, organize and manage documents or other files. It also allows creating folders, versioning of documents and check-in/check-out of files.
Form Library
Here you store and manage Microsoft Office InfoPath forms (or XML files for use with Microsoft Office InfoPath) for instance business forms like a status report, purchase orders, etc...
Picture Library
Here you can upload and share pictures with others and it includes a built-in image viewer.
Report Library
Here you can create web pages and reports to track business metrics, goals, KPIs (Key Performance Indicators) and business intelligence information.
Slide Library
It allows you to create a library for storing and sharing Microsoft PowerPoint slides.
Wiki Page Library
It allows you to create and store customizable pages of content that are linked together and can be edited by several people.


Refferences: